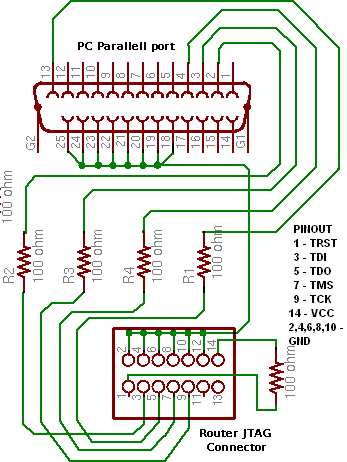
There are multiple schematics for the JTAG cable. The most popular and easy to make is the unbuffered JTAG, which consists just of a male parallel port connector and a few 100 ohm resistors. Here's the schematic:
 |
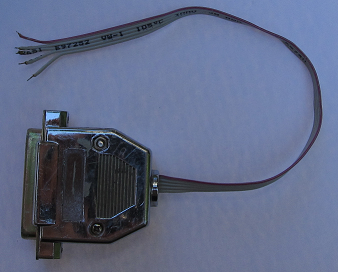 |
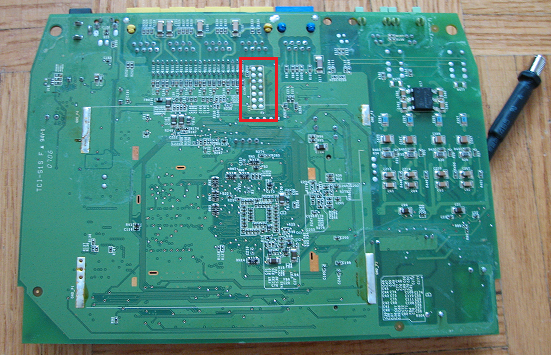
The picture on the right is my assembled version of the cable. There are only 5 wires coming out of my connector, for the JTAG pins 3,5,7,9 and GND. I do not use a connector for the JTAG pins, I simply solder the ends of the wires directly to the pads. Also the resistor between the pins 1 and 14 is not built into the cable, as I solder that directly between the pads.
The tools used with the JTAG cable can be downloaded from here. First, you would need to install the giveio.sys driver. Copy the file giveio.sys to C:\Windows\System32\drivers then start loaddrv.exe, enter C:\Windows\System32\drivers\giveio.sys in the path, and click Install.

You can also copy wrt54g.exe and tjtag.exe into a location that is part of the system PATH variable (such as C:\Windows) so that they can be run from any location on the HDD without having to make multiple copies of them in each location.
Once the driver is installed, when you need to do some work with the JTAG interface, you have to start it by typing the command net start giveio in a command prompt window. The driver will stay started until you reboot the computer.
The second important tool I use for unlocking ATAs is the serial console cable
The console cable is used to connect to an ATA's serial console connector. Again, only some ATAs allow this. When such a console exists, it can be used to send commands to the boot loader or after the OS has started. Some of the commands can erase and flash another firmware onto the device, others can modify passwords or other parameters read by the firmware.
A router console cannot be connected directly to the PC's serial port because the voltage levels on the regular serial port are from -12V to +12V and the roiuter expects only 3.3V. There are a variety of cables available on the market, most based on the MAX3232 IC or similar.
My choice is to make the cable from a cellular phone serial cable which can be found on eBay for less that $5 shipped. You must look for a USB cable that has a box in the middle. The box contains a USB to serial converter that already has the voltage levels adjusted. Another advantage to this is that it can be used on a computer without serial port. All you have to do is replace the portion of the cable that plugs into the cell phone with 3 wires for the RX, TX and GND signals. Here's a picture of my assembled cable:
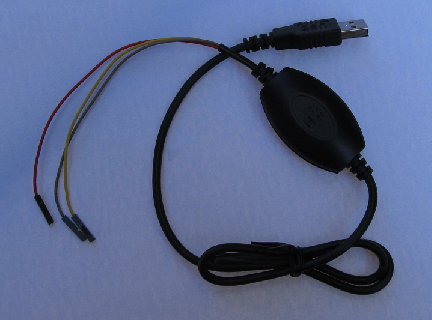
Some popular cell phone cables that can be used for this are the Nokia CA-42 or DKU-5 or the Siemens C25/35/45.
Also, I've seen some USB to Serial adapters recently on eBay for very reasonable prices: http://www.ebay.com/sch/i.html?_nkw=CP2102+USB+Serial+Converter. However, please note that some of them would convert the levels at 3.3V while others will use 5V. Make sure you measure the voltage between the RX and GND and between the TX and GND pins and it does not exceed 3.4-3.5V.
The software tool required with the console cable is a terminal emulation software. The most popular one is Hyperterminal included with most versions of Windows. My preference is using PuTTY.
The third tool I use for unlocking ATAs is a TFTP server, required for serving image files when flashing the firmware at the boot loader level. There are a few free TFTP server applications, but the easiest one to use which requires no installation is TFTPD32. Simply download the ZIP version of it, extract it to the filder where you keep the firmware files, and when you need it, just run the tftpd32.exe.