Before you start configuring the adapter, make sure you have the following settings for your SIP account:
- SIP Server address (sometimes called SIP Proxy)
- SIP User ID (in most cases this is the phone number)
- The password for the SIP account
To obtain these settings, you must contact Freephoneline and ask for your configuration file. There's a one time charge for this, currently $50 CAD + tax. They will send you a Word document with the settings.
Connect all the cables: power cord, the blue WAN port to your modem (or router), your PC to one of the yellow LAN ports and a phone into the green Phone 1 port. Wait a few seconds for the router to power up, then open a web browser and type http://192.168.15.1
Login with username Admin and blank password
Click Advanced on the top menu, then Voice Port 1 on the left
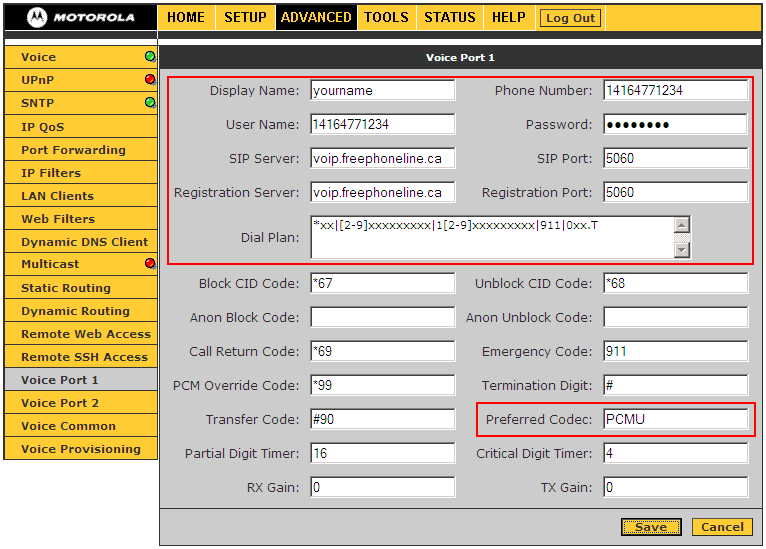
Enter the following settings:
- Display name: can be anything, you can put your name here
- Phone number: enter your freephoneline number, with "1" in front, for example 14164771234
- User name: same as the phone number
- Password: the SIP password for your freephoneline account
- SIP Server: voip.freephoneline.ca (if you have one way audio issues, try also voip3.freephoneline.ca)
- SIP Port: 5060
- Registration Server: voip.freephoneline.ca (if you have one way audio issues, try also voip3.freephoneline.ca)
- Registration Port: 5060
- Dial Plan: copy/paste the following string
*xx|[2-9]xxxxxxxxx|1[2-9]xxxxxxxxx|911|0xx.T
- (optional) Preferred codec: the default value, PCMU means to use the g711 codec. If you wish to change the codec to g729 type G729 in this field
If you're having issues dialing DTMF digits (when using calling cards, dialing phone extensions, etc) go to the Advanced on the top menu, then Voice Common on the left:
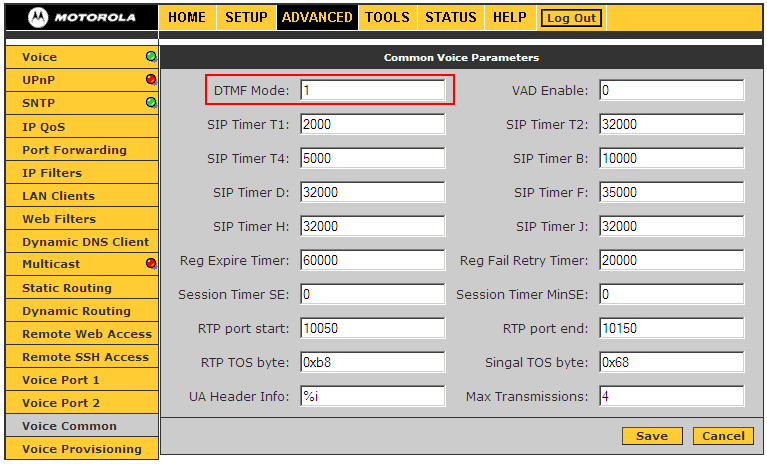
Try all the values between 1 and 4 for the DTMF Mode setting.
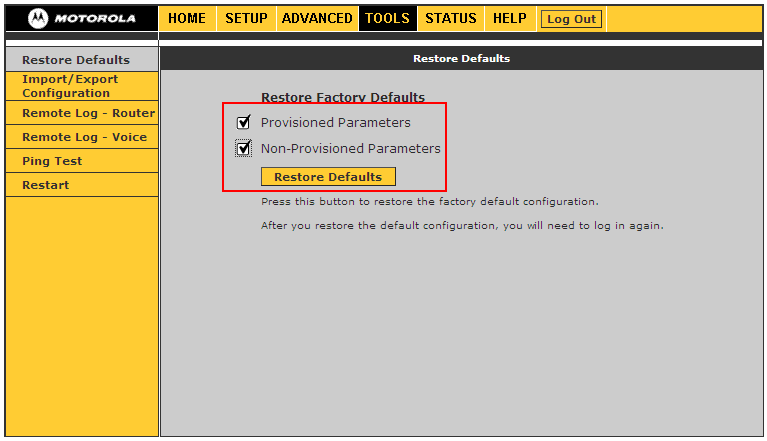
To factory reset the adapter
Go to the Tools menu at the top and then Restore Defaults on the left. Check the boxes that apply (Provisioned Parameters to reset the VoIP settings, Non-Provisioned Parameters to reset the router settings) and click Restore Defaults